
Download
Step 1. Add the JitPack repository to your build file
Add it in your root settings.gradle at the end of repositories:
	dependencyResolutionManagement {
		repositoriesMode.set(RepositoriesMode.FAIL_ON_PROJECT_REPOS)
		repositories {
			mavenCentral()
			maven { url 'https://jitpack.io' }
		}
	}
Add it in your settings.gradle.kts at the end of repositories:
	dependencyResolutionManagement {
		repositoriesMode.set(RepositoriesMode.FAIL_ON_PROJECT_REPOS)
		repositories {
			mavenCentral()
			maven { url = uri("https://jitpack.io") }
		}
	}
Add to pom.xml
	<repositories>
		<repository>
		    <id>jitpack.io</id>
		    <url>https://jitpack.io</url>
		</repository>
	</repositories>
Add it in your build.sbt at the end of resolvers:
resolvers += "jitpack" at "https://jitpack.io"
Add it in your project.clj at the end of repositories:
:repositories [["jitpack" "https://jitpack.io"]]
Step 2. Add the dependency
	dependencies {
		implementation 'com.github.enryold:onion-cache:0.0.12'
	}
dependencies {
implementation("com.github.enryold:onion-cache:0.0.12")
} <dependency>
<groupId>com.github.enryold</groupId>
<artifactId>onion-cache</artifactId>
<version>0.0.12</version>
</dependency>
libraryDependencies += "com.github.enryold" % "onion-cache" % "0.0.12"
:dependencies [[com.github.enryold/onion-cache "0.0.12"]]
Readme
onion-cache


Multilevel cache system for Java 8
Goal - Build a multilayer cache system:
- That makes simple add/remove different layers of cache.
- With a system that fallback through one or multiple cache layers before getting the needed object from the main datasource.
How I design it:
- I try to generealize the concept of cache layer in order to write less logic as possible.
- I came up with 3 main entity that describes a Cache Layer.
- A service, which represent a client wrapper for cache/datastore service in real world. It must implement 4 basic methods: GET, SET, SETEX, DELETE. In this way you can implement your own RedisService that can use HSET instead of SET.
- A marshaller, which marshall/unmarshall the data you want to cache. It must implement 2 methods: marshall() and unMarshall().
- A DataModel that will be the father of your data models (!!!)
- OnionCache addLayer() method will insert a cache layer. The last layer will be the main datasource.
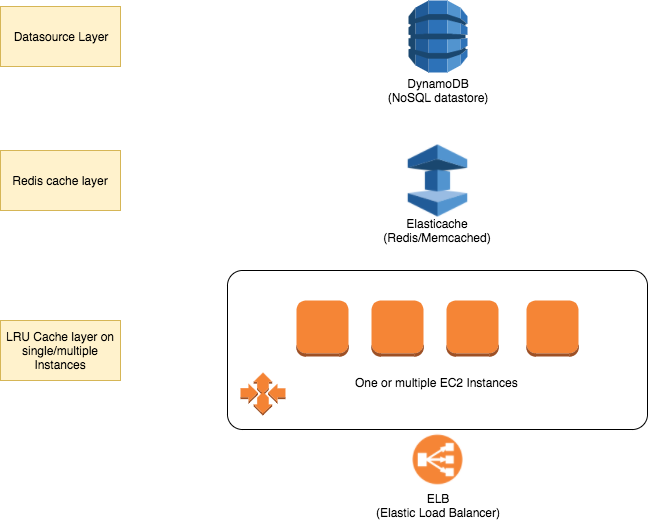
- A typical use case will be (in order!): addLayer(LRU); addLayer(Redis); addLayer(MySQL);
- Then, you can get/set/delete your data into multiple level of cache with one call to OnionCache.
- You can extend it building new services, keys, marshallers.
- At the moment OnionCache comes with some services: LRUCache, Redis, DynamoDb, FileSystem (this is useful if you use as main datastore a network file system like Amazon NFS)
Requirements:
- Every model you use with OnionCache must implements the ICacheLayerDataModel interface.
-
ICacheLayerDataModel interface comes with 2 methods:
- ICacheLayerDataModelKey dataModelUniqueKey()
- This return an object that extends the interface ICacheLayerDataModelKey, with represent a unique key for your data object.
- String dataModelTableName();
- This return the model datasource table name.
- ICacheLayerDataModelKey dataModelUniqueKey()
-
Under /models you can find an example with dynamodb as datasource.
Installation:
Look at https://jitpack.io/#enryold/onion-cache/
Let's start:
Imagine a system that saves data on DynamoDb, but some datas are very popular in certain period of time with an increase of throughput-rate. In this case is useful to put Redis or Memcached between your webapp and DynamoDb and an LRU cache inside your application to avoid any network call.
First of all we have to create all the layers we need in our system design, with their services, keys, and marshallers
// THIS EXAMPLE CAN BE FOUND UNDER /test FOLDER IN METHOD NAMED test_LRU_REDIS_DYNAMODB_FALLBACK()


// SERVICES FIRST

// IN MEMORY LRU SERVICE, 100 is the size of the LRU map.
InMemoryLRUService inMemoryLRUService = new InMemoryLRUService(100);

// REDIS SERVICE
RedisService redisService = new RedisService("localhost", 6379);

// DYNAMODB SERVICE
DynamoDBService onionDynamoDBService = new DynamoDBService(dynamodb);

// NOW BUILD CACHE LAYERS FOR THE MODEL Person, WITH REPRESENT A PERSON WITH NAME AND SURNAME PROPERTIES.
CacheLayer LRULayer = new CacheLayer<InMemoryLRUService, CacheLayerJsonMarshaller<Person>, Person>()
    .withMainService(inMemoryLRUService)
    .withMainServiceMarshaller(new CacheLayerJsonMarshaller<>(Person.class, String.class));

CacheLayer DynamoDBLayer = new CacheLayer<DynamoDBService, CacheLayerDynamoDBMarshaller<Person>, Person>()
    .withMainService(onionDynamoDBService)
    .withMainServiceMarshaller(new CacheLayerDynamoDBMarshaller<>(Person.class, Person.class));

// IN REDIS WE CAN SET DEFAULT EXPIRATION FOR KEYS IN SECONDS
CacheLayer redisLayer = new CacheLayer<RedisService, CacheLayerJsonMarshaller<Person>, Person>()
    .withMainService(redisService)
    .withMainServiceMarshaller(new CacheLayerJsonMarshaller<>(Person.class, String.class))
    .withDefaultExpiration(3600);

// NOW WE ARE READY TO BUILD OUR ONIONCACHE OBJECT, THE ORDER OF addLayer IS IMPORTANT!!
OnionCache<Person> onionCache = new OnionCache<Person>()
    .addLayer(LRULayer)
    .addLayer(redisLayer)
    .addLayer(DynamoDBLayer);

// THEN, WE CAN USER ONIONCACHE TO RETRIEVE OUR OBJECTS FROM THE LAYERS.
Optional<Person> object = onionCache.get(new Person("Jason", "Bourne"));

// HOWEVER, WE CAN ALSO SET A NEW OBJECT, WITH CUSTOM DEFAULT EXPIRATION (This works only in Redis/Memcached)
Person goJason = new Person("Jason", "Bourne");
boolean success = onionCache.set(goJason.getName(), goJason.getSurname(), goJason, 30 );