
Download
Step 1. Add the JitPack repository to your build file
Add it in your root settings.gradle at the end of repositories:
	dependencyResolutionManagement {
		repositoriesMode.set(RepositoriesMode.FAIL_ON_PROJECT_REPOS)
		repositories {
			mavenCentral()
			maven { url 'https://jitpack.io' }
		}
	}
Add it in your settings.gradle.kts at the end of repositories:
	dependencyResolutionManagement {
		repositoriesMode.set(RepositoriesMode.FAIL_ON_PROJECT_REPOS)
		repositories {
			mavenCentral()
			maven { url = uri("https://jitpack.io") }
		}
	}
Add to pom.xml
	<repositories>
		<repository>
		    <id>jitpack.io</id>
		    <url>https://jitpack.io</url>
		</repository>
	</repositories>
Add it in your build.sbt at the end of resolvers:
resolvers += "jitpack" at "https://jitpack.io"
Add it in your project.clj at the end of repositories:
:repositories [["jitpack" "https://jitpack.io"]]
Step 2. Add the dependency
	dependencies {
		implementation 'com.github.kaedea:android-tagview:'
	}
dependencies {
implementation("com.github.kaedea:android-tagview:")
} <dependency>
<groupId>com.github.kaedea</groupId>
<artifactId>android-tagview</artifactId>
<version></version>
</dependency>
libraryDependencies += "com.github.kaedea" % "android-tagview" % ""
:dependencies [[com.github.kaedea/android-tagview ""]]
Readme
Android-Cloud-TagView-Plus
###Introduction An Android Cloud Tag Widget. You can edit the tag's style, and set listener of selecting or deleting tag. Used in APP with ten millions of users.
###Screenshot
Sample
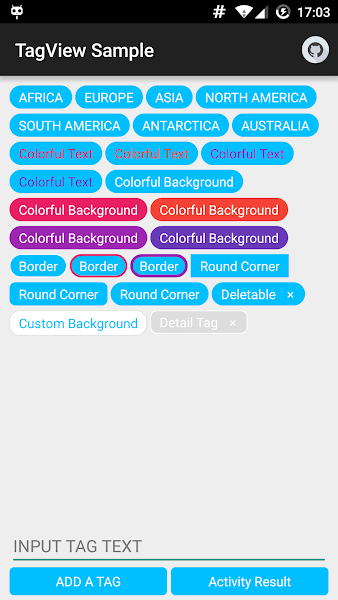
used in app with ten millions of users(YY)
###Feature
- Editable Style of Text, such as Font size and color.
- Editable Style of Tag, Background/Pressed Color, Radius effect, Custom Background, Delete mode.
- Listener of tag selecting and deleting.
- Can be created from XML file or Java code.
###Sample Apk download apk
###Usage used in xml file
<me.kaede.tagview.TagView
            android:id="@+id/tagview"
            android:layout_width="match_parent"
            android:layout_height="wrap_content"
            android:layout_marginTop="10dp"
            app:lineMargin="5dp"
            app:tagMargin="3dp"
            app:textPaddingBottom="3dp"
            app:textPaddingLeft="10dp"
            app:textPaddingRight="10dp"
            app:textPaddingTop="3dp">
</me.kaede.tagview.TagView>
or used by java code
TagView tagview2 = new TagView(this);
tagview2.setLineMargin(20f);//dp
tagview2.setTagMargin(20f);
tagview2.setTextPaddingLeft(20f);
tagview2.setTextPaddingTop(20f);
tagview2.setTextPaddingRight(20f);
tagview2.setTexPaddingBottom(20f);
add a lot of tags
String[] tags = getResources().getStringArray(R.array.continents);
tagView.addTags(tags);
add a tag in details
Tag tag = new Tag("Tag Text");
tag.tagTextColor = Color.parseColor("#FFFFFF");
tag.layoutColor =  Color.parseColor("#DDDDDD");
tag.layoutColorPress = Color.parseColor("#555555");
//or tag.background = this.getResources().getDrawable(R.drawable.custom_bg);
tag.radius = 20f;
tag.tagTextSize = 14f;
tag.layoutBorderSize = 1f;
tag.layoutBorderColor = Color.parseColor("#FFFFFF");
tag.isDeletable = true;
tagView.addTag(tag);
###To-Do List
- Animation Support
- Multi Tag Arrange Type (such as Right-To-Left arrange)
- Improve Performance
###Problem
TagView supports to be used as ItemView in ListView/GridView/RecyclerView, but it will remove and re-add its tags very frequently when you are flinging. Therefore the performance of TagView in ItemView maybe not good if you have a lot of ItemViews using TagView. And in this situation it is advised to use SpannableString instead of views. I will add SpannableString version of TagView to improve the performance in ItemView.
###Substitute
- https://github.com/namito/TagCloudLinkView
- https://github.com/mcharmas/android-tagview
##中文 ###简介 Android上的云标签控件,除了能设置标签的样式外,还能监听标签的点击和删除事件。目前已在千万级用户的应用上使用。
###特点
- 支持设置标签内容的样式,如字体大小、颜色
- 支持设置标签的颜色(或者自定义布局)、点击效果、圆角效果、是否可删除
- 能监听标签的点击和删除事件
- 支持从代码或者XML创建TagView
###待完成
- 动画效果
###License
Copyright 2015 Kaede Akatsuki

Licensed under the Apache License, Version 2.0 (the "License");
you may not use this file except in compliance with the License.
You may obtain a copy of the License at

http://www.apache.org/licenses/LICENSE-2.0

Unless required by applicable law or agreed to in writing, software
distributed under the License is distributed on an "AS IS" BASIS,
WITHOUT WARRANTIES OR CONDITIONS OF ANY KIND, either express or implied.
See the License for the specific language governing permissions and
limitations under the License.