 Nextome/GeoJsonify
Easily add GeoJson layers to your Maps https://nextome.github.io/GeoJsonify/index.html

Download
Step 1. Add the JitPack repository to your build file
Add it in your root settings.gradle at the end of repositories:
	dependencyResolutionManagement {
		repositoriesMode.set(RepositoriesMode.FAIL_ON_PROJECT_REPOS)
		repositories {
			mavenCentral()
			maven { url 'https://jitpack.io' }
		}
	}
Add it in your settings.gradle.kts at the end of repositories:
	dependencyResolutionManagement {
		repositoriesMode.set(RepositoriesMode.FAIL_ON_PROJECT_REPOS)
		repositories {
			mavenCentral()
			maven { url = uri("https://jitpack.io") }
		}
	}
Add to pom.xml
	<repositories>
		<repository>
		    <id>jitpack.io</id>
		    <url>https://jitpack.io</url>
		</repository>
	</repositories>
Add it in your build.sbt at the end of resolvers:
resolvers += "jitpack" at "https://jitpack.io"
Add it in your project.clj at the end of repositories:
:repositories [["jitpack" "https://jitpack.io"]]
Step 2. Add the dependency
	dependencies {
		implementation 'com.github.nextome:geojsonify:-SNAPSHOT'
	}
dependencies {
implementation("com.github.nextome:geojsonify:-SNAPSHOT")
} <dependency>
<groupId>com.github.nextome</groupId>
<artifactId>geojsonify</artifactId>
<version>-SNAPSHOT</version>
</dependency>
libraryDependencies += "com.github.nextome" % "geojsonify" % "-SNAPSHOT"
:dependencies [[com.github.nextome/geojsonify "-SNAPSHOT"]]
Readme
GeoJsonify
Simply add GeoJson layers to your Maps
 <br>
<br>
Supported Map Services:
How to use
- Add JitPack in your root build.gradle at the end of repositories:
	allprojects {
		repositories {
			...
			maven { url 'https://jitpack.io' }
		}
	}
- Add the dependency in your module build.gradle:
	dependencies {
	        compile 'com.github.Nextome:GeoJsonify:v1.0.0'
	}
- Simply use the method:
GeoJsonify.geoJsonifyMap(map, List<Uri> jsonUris, int color, Context context);
-
map is the map where the layers will be added. It can be a GoogleMap (Google Maps) / MapboxMap (Mapbox) / MapView (OSM)
-
jsonUris is a list of URIs, each one with a different .geojson file to parse.
- color is the color of the lines that will be rendered.
Alternativly, you can also specify a different color for each layer using
GeoJsonify.geoJsonifyMap(map, List<Uri> jsonUris, List<Integer> colors, Context context);
Javadoc
Available here.
Example (Google Maps)
Here's a full Google Maps implementation:
public class GoogleMapsActivity extends MapBaseActivity implements OnMapReadyCallback {
@Override
protected void onCreate(Bundle savedInstanceState) {
super.onCreate(savedInstanceState);
this.getIntentExtras(getIntent());
setContentView(R.layout.activity_maps);
SupportMapFragment mapFragment = (SupportMapFragment) getSupportFragmentManager()
.findFragmentById(R.id.map);
mapFragment.getMapAsync(this);
}
@Override
public void onMapReady(GoogleMap googleMap) {
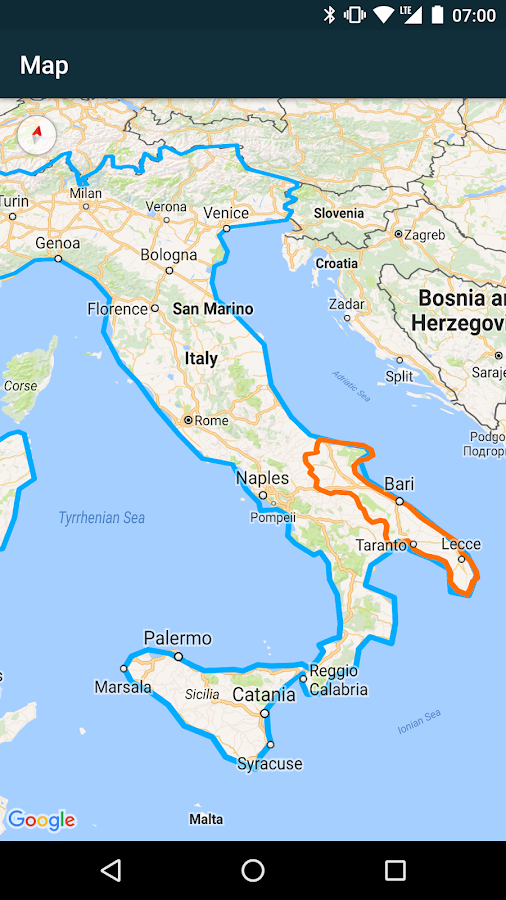
Uri uri1 = Uri.fromFile(new File(Environment.getExternalStorageDirectory().getPath() + "italy.geojson"));
Uri uri2 = Uri.fromFile(new File(Environment.getExternalStorageDirectory().getPath() + "puglia.geojson"));
List<Uri> URIs = new ArrayList<>();
URIs.add(uri1);
URIs.add(uri2);
try {
GeoJsonify.geoJsonifyMap(googleMap, URIs, Color.BLACK, this.getContext());
} catch (IOException e) {
e.printStackTrace();
Toast.makeText(this.getContext(), "Unable to read file", Toast.LENGTH_SHORT).show();
} catch (JSONException e) {
e.printStackTrace();
Toast.makeText(this.getContext(), "Unable to parse file", Toast.LENGTH_SHORT).show();
}
}
}
For more examples with all services, see our example app GeoJson Viewer <br> <br> <br>
GeoJson Viewer
View GeoJson files on your Android Device

<a href='com.nextome.geojsonviewer?pcampaignid=MKT-Other-global-all-co-prtnr-py-PartBadge-Mar2515-1'><img width="320" alt='Get it on Google Play' src='https://play.google.com/intl/en_us/badges/images/generic/en_badge_web_generic.png'/></a>
How to use
Simply choose a GeoJson file on your device and select a map provider from the list.
Supported Map Services:
Examples
Map with Polygons, Lines and Points
<img src="https://github.com/Nextome/geojson-viewer/blob/master/resources/example_path.png" width="480">Different Services
Same .geojson file opened with Google Maps, Open Street Map and MapBox
<img src="https://github.com/Nextome/geojson-viewer/blob/master/resources/example_gmaps.png" width="200"> <img src="https://github.com/Nextome/geojson-viewer/blob/master/resources/example_osm.png" width="200"> <img src="https://github.com/Nextome/geojson-viewer/blob/master/resources/example_mapbox.png" width="200">
How to build the project
- Clone the project;
- Open Android Studio and select Import Project;
- Add your own Google Maps and Mapbox API keys in strings.xml;
We'll also be happy to accept your pull requests.
Read More
Read more about adding a GeoJson layer on maps on our blog.
Install the app
GeoJson Viewer is available for free on Google Play.
Licence
GeoJson Viewer is licensed under the Apache License 2.0.
Made at Nextome.